Redis로 사용자 인증 구현하기
Table of contents
먼저 내가 생각한 사용자 인증기능은 다음과 같다.
- 사용자의 이메일로 서버측에서 무작위로 생성한 유효시간이 3분인 인증번호(난수)를 보낸다.
- 서버측은 무작위로 생성한 인증번호와 사용자 이메일을 함께 보관한다.
- 사용자는 받은 인증번호를 서버에 전달한다.
- 서버측은 사용자가 보낸 인증번호와 사용자의 이메일을 통해 서버측이 보관하고 있는 인증번호가 일치하는지 확인하고 유효 시간 내에 입력했는지도 확인한다.
- 인증번호 인증 성공 시, 사용자의 등급을 인증회원으로 변경한다.
💡 위 과정을 구현하기 위해서는 사용자 이메일을 key, 인증번호를 value로 저장해야함을 생각했다.
그리고 인증번호 특성상 데이터의 유효시간도 짧고 오랫동안 보관될 필요가 없으며 연관관계가 필요한 데이터가 아니기 때문에
In-Memory 기반 데이터 스토리지로 응답속도가 빠르고 데이터를 key-value 데이터 형식으로 저장할 수 있는 Redis를 이용하기로 결정했다.
인증번호 생성 후, 메일 전송 및 레디스 저장하기
build.gradle 의존성 추가
implementation 'org.springframework.boot:spring-boot-starter-data-redis:3.0.4'
implementation 'org.springframework.boot:spring-boot-starter-mail'
Redis를 사용하기 위한 라이브러리와, 이메일로 인증번호를 전송해야하기 때문에 mail 관련 라이브러리를 추가해준다.
application.yml 추가
spring:
  mail:
    host: smtp.gmail.com
    port: 587
    username: {사용할 gmail 계정}
    password: {앱 비밀번호}
    properties:
      mail.smtp.auth: true
      mail.smtp.starttls.enable: true

	...

  data:
    redis:
      cache:
        host: localhost
        port: 6379
      auth:
        host: localhost
        port: 6380
gmail 관련 smtp 프로토콜 설정은 다음과 같다.
smtp 관련 앱 비밀번호 발급 등등에 관한 사항은 다루지 않겠다.
이미 레디스의 6379 포트는 HTTP GET 요청 시 데이터 캐싱용으로 사용하고 있으므로 6380포트로 설정했다.
RedisConfig 생성
@Configuration
public class RedisAuthConfig {

    @Value("${spring.data.redis.auth.host}")
    private String host;
    @Value("${spring.data.redis.auth.port}")
    private int port;

    @Bean
    public RedisConnectionFactory redisAuthConnectionFactory() {
        return new LettuceConnectionFactory(host, port);
    }

    @Bean(name = "redisTemplate")
    public StringRedisTemplate stringRedisTemplate() {
        StringRedisTemplate stringRedisTemplate = new StringRedisTemplate();
        stringRedisTemplate.setConnectionFactory(redisAuthConnectionFactory());
        return stringRedisTemplate;
    }
}
RedisConnectionFactory로는 Lettuce 와 Jedis 방식이 있는데, 성능상 유리한 Lettuce를 사용했다.
Lettuce와 Jedis 성능 비교 : https://jojoldu.tistory.com/418
그리고 이메일, 인증번호와 같은 단순 문자열을 데이터로서 사용하기 때문에 RedisTemplate를 구현한 StringRedisTemplate를 사용했다.
⚠️ @Bean(name = "redisTemplate") 로 name을 redisTemplate로 설정해주지 않으면
A component required a bean named 'redisTemplate' that could not be found. 와 같은 에러가 발생하므로 빈 이름을 설정해준다.
CertificationNumberDao
@RequiredArgsConstructor
@Repository
public class CertificationNumberDao  {

    private final StringRedisTemplate stringRedisTemplate;

    public void saveCertificationNumber(String email, String certificationNumber) {
        stringRedisTemplate.opsForValue()
            .set(email, certificationNumber,
                Duration.ofSeconds(LIMIT_TIME_CERTIFICATION_NUMBER));
    }

    public String getCertificationNumber(String email) {
        return stringRedisTemplate.opsForValue().get(email);
    }

    public void removeCertificationNumber(String email) {
        stringRedisTemplate.delete(email);
    }

    public boolean hasKey(String email) {
        return stringRedisTemplate.hasKey(email);
    }
}
레디스에 데이터를 저장 · 조회 · 삭제하기 위한 dao를 만든다.
Redis Template의 opsForValue()를 사용하면 String 자료구조에 대한 기능을 사용할 수 있다.
email 을 key로 certificationNumber를 value로 저장하고, 유효시간은 3분으로 설정해두었다.
그 외에, email로 certificationNumber를 찾는 메서드, 삭제하는 메서드, key값으로 데이터 유무를 확인하는 메서드를 추가했다.
EmailCertificationService
@RequiredArgsConstructor
@Service
public class EmailCertificationService {

    private final JavaMailSender mailSender;
    private final CertificationNumberDao certificationNumberDao;

    public void sendEmailForCertification(String email) throws NoSuchAlgorithmException, MessagingException {

        String certificationNumber = getCertificationNumber();

        String content = String.format("%s/api/v1/users/verify?certificationNumber=%s&email=%s   링크를 3분 이내에 클릭해주세요.", DOMAIN_NAME, certificationNumber, email);
        sendMail(email, content);
        certificationNumberDao.saveCertificationNumber(email, certificationNumber);
    }

    private static String getCertificationNumber() throws NoSuchAlgorithmException {
        String result;

        do {
            int i = SecureRandom.getInstanceStrong().nextInt(999999);
            result = String.valueOf(i);
        } while (result.length() != 6);

        return result;
    }

    private void sendMail(String email, String content) throws MessagingException {
        MimeMessage mimeMessage = mailSender.createMimeMessage();
        MimeMessageHelper helper = new MimeMessageHelper(mimeMessage);
        helper.setTo(email);
        helper.setSubject(MAIL_TITLE_CERTIFICATION);
        helper.setText(content);
        mailSender.send(mimeMessage);
    }
}
임의의 값을 seed로서 난수를 생성하는 클래스인 SecureRandom으로 6자리 난수를 생성해서, 이 수를 인증번호로 활용했다.
생성한 인증번호를 JavaMailSender를 활용하여 사용자 email로 인증번호를 전송하고
redis에 email을 key로, 인증번호를 value로 저장한다.
사용자에게 링크 형식으로 전달하고, 사용자가 링크를 클릭하면 인증번호와 이메일을 GET해서 처리할 예정이다.
RestController
    @PostMapping("/send-certification")
    public ResponseEntity<Response<String>> sendCertificationNumber(@Validated @RequestBody UserCertificateAccountRequest request, BindingResult bindingResult) throws NoSuchAlgorithmException, MessagingException {
        emailCertificationService.sendEmailForCertification(request.getEmail());

        return ResponseEntity.ok(Response.success("ok"));
    }
사용자가 requestDto에 email을 담아서 요청하면 지금까지 만들어논 로직에 따라 사용자에게 이메일을 전송하고 레디스에 저장하게 된다.
인증 처리하기
EmailCertificationService
    public void verifyEmail(String certificationNumber, String email) {
        if (isVerify(certificationNumber, email)) {
            throw new ShoeKreamException(ErrorCode.VERIFY_NOT_ALLOWED);
        }
        certificationNumberDao.removeCertificationNumber(email);
    }

    private boolean isVerify(String certificationNumber, String email) {
        return !(certificationNumberDao.hasKey(email) &&
                certificationNumberDao.getCertificationNumber(email)
                        .equals(certificationNumber));
    }
사용자에게 받은 인증번호를 확인하기 위한 메서드를 추가한다.
Reids에 인증을 요청한 email 데이터가 저장되어 있는지 · 사용자가 요청한 인증번호와 Redis에 저장되어 있는 인증번호가 일치하는지 확인한다.
확인이 되면, 인증번호는 더 이상 필요없으므로 삭제한다.
RestController
@GetMapping ("/verify")
    public ResponseEntity<Response<String>> verifyCertificationNumber(@RequestParam(name = "certificationNumber") String certificationNumber, @RequestParam(name = "email") String email) {

        emailCertificationService.verifyEmail(certificationNumber, email);
        userService.changeVerifiedUserRole(email);
        return ResponseEntity.ok(Response.success("ok"));
    }
사용자가 링크를 클릭하면 인증번호와 이메일로 인증과정을 거친 뒤, 인증을 마친 회원의 등급을 변경해주면 된다!
테스트
Redis 실행
로컬 환경에 도커가 깔려 있음을 가정하고 진행하겠다.
docker pull redis
위 명령어로 redis 이미지를 받는다.
docker run --name auth-redis -d -p 6380:6379 redis
auth-redis 라는 이름으로 redis 이미지를 -d 옵션을 통해 데몬 환경으로 컨테이너로 실행시킨다.
이전에, application.yml에서 host 쪽에서 6380 포트로 설정했고, redis 컨테이너는 기본적으로 6379 포트를 사용했으므로 -p 6380:6379 로 설정한다.

docker ps 를 입력해보면 정상 실행되고 있음을 확인할 수 있다.
동작 확인
어플리케이션을 실행시킨 뒤, post man으로 테스트를 해보자.
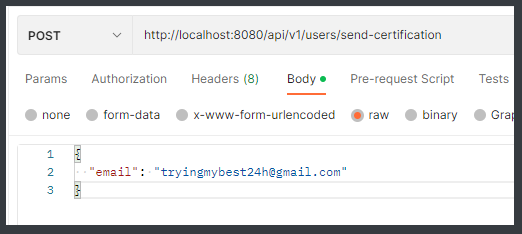
email을 request body에 담아 요청한다.

요청한 email로 인증번호 메일이 온 것을 확인할 수 있다.

Redis 컨테이너에 접속해서 데이터를 확인해보니 정상적으로 key - value 형식으로 저장된것을 확인할 수 있다.
이메일로 받은 링크를 클릭하면 사용자 인증 처리까지 된 것을 확인할 수 있다!