Spring Security를 이용한 회원가입 구현
Table of contents
- 스프링 Security
- JWT(Jason Web Token)
- 환경설정
- Entity, DTO 준비
- Filter Chain 설정
- Repository, Service 구현
- Exception 정의하기
- PostMapping controller 구현
- 동작 확인
스프링 Security
스프링 시큐리티는 애플리케이션의 인증 · 인가 등의 보안 기능을 제공하는 스프링 하위 프로젝트이다.
인증 : 데이터베이스에 등록된 아이디와 패스워드가 사용자가 입력한 것과 비교해서 일치 여부를 확인하고, 로그인에 성공하면 서버는 사용자에게 토큰을 전달한다. 그 토큰을 통해 사용자는 원하는 리소스에 접근할 수 있게 된다.
인가 : 토큰 유무를 통해 사용자가 리소스에 접근할 권리가 있는지 확인하고 허가한다.
스프링 시큐리티는 서블릿 필터를 기반으로 동작하며, 수많은 필터를 거치게 된다.
- 사용자가 인증을 요청한다.
- 정의된 필터에 따라 인증 과정이 진행된다.
JWT(Jason Web Token)
JWT는 정보를 JSON 형태로 안전하게 전송하기 위한 토큰으로, 디지털 서명이 적용되어 있어 신뢰할 수 있다.
주로 서버와의 통신에서 권한 인가를 위해 사용된다.
헤더로 설정한 해싱 알고리즘으로 헤더와 내용이 인코딩되어 서명을 생성한다.
환경설정
	//security 관련 라이브러리
	implementation 'org.springframework.security:spring-security-test'
	implementation group: 'io.jsonwebtoken', name: 'jjwt', version: '0.9.1'
	implementation group: 'org.springframework.boot', name: 'spring-boot-starter-security', version: '2.7.5'
security 기능을 활용하기 위해 위 라이브러리를 추가한다.
https://mvnrepository.com/artifact/org.springframework.boot/spring-boot-starter-security
위 사이트에서 사용하고 있는 springboot에 맞는 버전을 선택해서 추가한다.
Entity, DTO 준비
@Entity
@Getter
@NoArgsConstructor(access = AccessLevel.PROTECTED)
public class User {

    @Id
    @GeneratedValue(strategy = GenerationType.IDENTITY)
    private Long id;

    @Column(nullable = false, unique = true)
    private String userId;

    @Column(nullable = false)
    private String password;

    @Column(nullable = false)
    private String userName;
    private String phone;
    private String email;

    public User(String userId, String password, String userName, String phone, String email) {
        this.userId = userId;
        this.userName = userName;
        this.password = password;
        this.phone = phone;
        this.email = email;
    }

    public User(UserJoinRequest userJoinRequest) {
        this.userId = userJoinRequest.getUserName();
        this.password = userJoinRequest.getPassword();
        this.userName = userJoinRequest.getUserName();
        this.phone = userJoinRequest.getPhone();
        this.email = userJoinRequest.getEmail();
    }
}
위와 같이, userId,password,userName,phone,email 속성을 갖는 User 엔티티가 있다.
id 는 DB에서 Auto increment 되게끔 설정하였으므로, id를 제외한 멤버들을 생성자로 받는 constructor를 추가했다.
엔티티를 직접 다루면 좋지 않기 때문에, RequestDTO 와 ResponseDTO를 만들 것이다.
회원 가입 요청시 사용할 UserJoinRequest DTO를 받아 엔티티를 초기화 해주기 위한 기본 생성자도 추가해주었다.
@Getter
@AllArgsConstructor
@NoArgsConstructor
public class UserJoinRequest {
    private String userId;
    private String password;
    private String userName;
    private String email;
    private String phone;

    public User toEntity(String password) {
        return new User(this.userId, password, this.userName, this.phone, this.email);
    }
}
회원 가입시, userId,password,userName,phone,email 를 PostMapping과 @RequestBody를 이용해서 전달받을 계획이기 때문에 만든 DTO이다.
password를 파라미터로 받아 User 엔티티를 반환하게끔 구현한 toEntity 메서드는 BCryptPasswordEncoder로 비밀번호를 암호화 한 뒤 다시 초기화 하기위해 만들어 두었다.
@AllArgsConstructor
@Getter
public class UserJoinResponse {
    private String userId;
    private String userName;

    public UserJoinResponse(User user) {
        this.userId = user.getUserId();
        this.userName = user.getUserName();
    }
}
UserJoinResponse는 회원가입이 완료된 후, userId 과 userId 정보만 사용자에게 응답하기 위해 만든 DTO이다.
회원가입이 완료되면, body 부에 id와 name을 보여주는 것이 목표이다.
Filter Chain 설정
SecurityFilterChain 을 이용해서 해당 클래스의 메서드를 이용해서 요구사항을 설정할 것이다.
SecurityFilterChain을 사용하는 것은 스프링에서도 권장하는 방법이다.
메서드를 정의해서 HttpSecurity 를 설정한 뒤 SecurityFilterChain 클래스로 반환하도록 한다.
@EnableWebSecurity //@Configuration 어노테이션 포함 및 보안 기능 활성화
public class SecurityConfig {
    //Http Security를 설정한다.
    @Bean
    public SecurityFilterChain securityFilterChain(HttpSecurity httpSecurity) throws Exception {
        return httpSecurity
                .httpBasic().disable()//기본 ui 사용, 사용하지 않을 시 disable()
                .csrf().disable()//REST API에서 csrf 보안이 필요없기 때문에 비활성화,
                .cors().and()
                .authorizeRequests()// 요청에 대한 사용 권한을 체크
                .antMatchers("/api/**").permitAll()//antMatchers 파라미터로 설정한 리소스 접근을 인증절차 없이 허용
                .antMatchers("api/v1/users/join", "/api/v1/users/login").permitAll()//antMatchers 파라미터로 설정한 리소스 접근을 인증절차 없이 허용
                .and()
                .sessionManagement()
                .sessionCreationPolicy(SessionCreationPolicy.STATELESS)//STATELESS로 설정함으로서 인증 정보를 서버에 담아두지 않음,JWT 토큰을 사용할 것이기 때문
                .and()
                .build();
    }
}
그리고 비밀번호를 암호화 하기 위해 BCryptPasswordEncoder 클래스의 메서드를 사용해야하기 때문에 빈으로 등록한다.
@Configuration
public class EncryptorConfig {

    @Bean
    public BCryptPasswordEncoder encodePwd() {
        return new BCryptPasswordEncoder(); //패스워드 인코딩 시 사용
        //BCryptPasswordEncoder 는 시큐리티 프레임워크에서 제공하는 클래스 중 하나로 비밀번호를 암호화 하는데 사용할 수 있는 메서드를 갖고 있다.
    }
}
Repository, Service 구현
JpaRepository 를 상속받는 UserRepository 에 Optional로 감싸서 반환하도록 메서드 명명규칙에 따라 메서드를 정의해준다.
@Repository
public interface UserRepository extends JpaRepository<User, Long> {

    Optional<User> findByUserId(String userId);
}
위 메스드를 이용해서 Id 를 기준으로 DB에서 탐색해서, 중복 Id 인지 체크할 것이다.
나는 Service class를 구현할 때 Service 레이어에서 DTO 객체에 의존하지 않게 하기 위해서, DTO는 아예 사용하지 않도록 구현하였다.
@Service
@RequiredArgsConstructor
@Transactional(readOnly = true)
public class UserService {

    private final UserRepository userRepository;

    @Transactional
    public User join(User user) {
        userRepository.findByUserId(user.getUserId())
                .ifPresent( user1 -> {
                    throw new HospitalReviewAppException(ErrorCode.DUPLICATED_USER_NAME, String.format("UserId : %s",user1.getUserId()));
                });
        userRepository.save(user);

        return user;
    }
}
join 메서드는 암호화된 패스워드를 갖고 있는 엔티티 형태의 User 객체를 파라미터로 받는다.
파라미터로 받은 User 의 UserId가 이미 존재하면 Repository의 메서드 결과가 반환될 것이므로
Optional 클래스의 ifPresent() 메서드를 이용해서 확인하고, 존재한다면 직접 정의한 HospitalReviewAppException 에러를 발생시킨다.
존재하지 않는다면, save() 메서드로 암호화된 패스워드를 가진 User를 DB에 저장한다.
Exception 정의하기
UserSerivce 의
throw new HospitalReviewAppException(ErrorCode.DUPLICATED_USER_NAME, String.format("UserId : %s",user1.getUserId()));
이 부분을 설명해보겠다.
먼저, 이미 같은 아이디를 가진 회원이 DB에 저장되어 있으면 HospitalReviewAppException 에러를 발생시키고,
Http 상태 코드와 에러 메세지를 보여주기 위해 위와 같은 파라미터를 구성하였다.
@Getter
@AllArgsConstructor
public class HospitalReviewAppException extends RuntimeException{

    private ErrorCode errorCode;
    private String message;

    @Override
    public String toString(){
        if (message == null) return errorCode.getMessage();
        return String.format("%s, %s", errorCode.getMessage(), message);
    }
}
HospitalReviewAppException 클래스는 기본생성자로 (Http상태코드, 에러메세지) 를 받는다고 생각하면 된다.
@AllArgsConstructor
@Getter
public enum ErrorCode {
    DUPLICATED_USER_NAME(HttpStatus.CONFLICT, "user name is duplicated"),
    USER_NOT_FOUNDED(HttpStatus.NOT_FOUND, "not found error"),
    INVALID_PASSWORD(HttpStatus.BAD_REQUEST, "bad Request");

    private HttpStatus httpStatus;
    private String message;

}
ErrorCode 는 Enum 클래스로 정의하였다.
각각의 열거형 멤버들은, 다른 Http 상태코드와 메세지를 갖고 있고,
상태코드는 ResponseEntity의 status 파라미터로, 메시지는 직접 정의할 Response 에 담아 JSON 형태로 body로 나타낼 것이다.
//에러 코드를 포함시켜 리턴하기 위함
@AllArgsConstructor
@Getter
public class Response<T> {
    private String resultCode;
    private T result;

    public static Response<Void> error(String resultCode){
        return new Response(resultCode, null);
    }

    public static <T> Response<T> success(T result){
        return new Response<>("SUCCESS", result);
    }
}
JSON 형식으로 에러코드와 에러 메세지를 보기 위해 위와 같은 Response 클래스를 생성한다.
@RestControllerAdvice
public class ExceptionManager {
    @ExceptionHandler(HospitalReviewAppException.class)
    public ResponseEntity<?> hospitalReviewAppExceptionHandler(HospitalReviewAppException e){
        return ResponseEntity.status(e.getErrorCode().getHttpStatus())
                .body(Response.error(e.getErrorCode().getMessage()));
    }

}
에러가 발생하면, ErrorCode Enum 클래스에서 정의한 에러 메세지와 null이 반환될 것이고
성공적으로 저장이 되면, “SUCCESS” 메세지와 UserJoinResponse 가 JSON 형태로 반환될 것이다. (success 메서드 파라미터로 UserJoinResponse 를 전달할 것이다.)
@RestControllerAdvice
- @ControllerAdvice와 @ResponseBody를 합쳐놓은 어노테이션이다. 단순히 예외만 처리하고 싶다면
@ControllerAdvice를 적용하면 되고, 응답으로 객체를 리턴해야 한다면@RestControllerAdvice를 적용하면 된다.@ControllerAdvice
@ExceptionHandler,@ModelAttribute,@InitBInder가 적용된 메서드들에 AOP를 적용해 Controller 단에 적용하기 위해 고안된 어노테이션.- 모든 @Controller에 대한 전역적으로 발생할 수 있는 예외를 잡아서 처리할 수 있습니다.
@ExceptionHandler
- 인자로 캐치하고 싶은 예외 클래스를 등록해주면 된다.
PostMapping controller 구현
@RestController
@RequestMapping("api/v1/users")
@RequiredArgsConstructor
@Slf4j
public class UserController {

    private final UserService userService;
    private final BCryptPasswordEncoder encoder;

    @PostMapping("/join")
    public Response<UserJoinResponse> join(@RequestBody UserJoinRequest userJoinRequest) {

        User join = userService.join(userJoinRequest.toEntity(encoder.encode(userJoinRequest.getPassword())));
        UserJoinResponse userJoinResponse = new UserJoinResponse(join);
        return Response.success(userJoinResponse);

    }
}
BCryptPasswordEncoder의encode()메서드로 회원가입시 요청받은 비밀번호를 암호화 한다. (똑같은 패스워드를 인코딩하더라도 매번 다른 문자열을 반환한다. -> 제출한 비밀번호와 암호회된 비밀번호 일치여부를 확인하는 메서드가 존재)암호화된 비밀번호를 파라미터로 받아서, [사용자 아이디, 이름, 암호화된 비밀번호, 이메일, 전화번호] 로 Entity를 구성한 뒤
UserService의join메서드에 전달한다. (만약, 이 단계에서 이미 가입된 아이디라면 에러를 반환한다.)저장한 엔티티를
UserJoinResponse객체로 생성자 파라미터로 넘겨서 제한된 정보만 담은뒤 응답한다.Response클래스에 의해, 제한된 정보만 담긴userJoinResponse의 Json 형태의 데이터와 “Sucess” 메세지가 JSON 형태로 반환될 것이다.
동작 확인
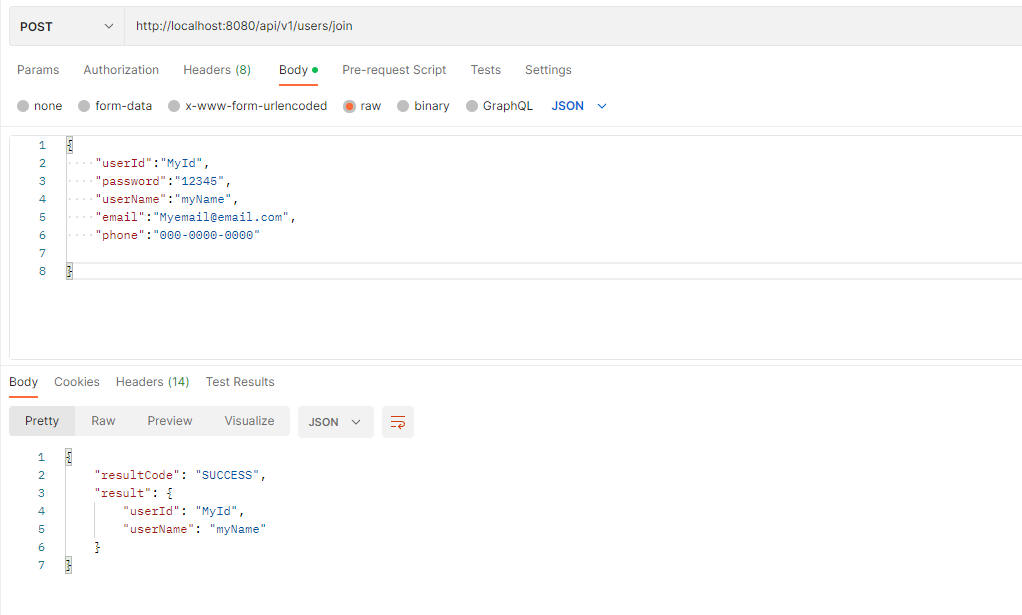
예상한 대로, 반환됨을 확인할 수 있었다.

또한, DB에도 데이터가 입력된 것을 확인했고, password도 암호화된 상태로 DB에 저장됨을 확인할 수 있다.
한번 더 같은 ID로 POST 요청을 하면 에러가 발생되는지 확인해보겠다.
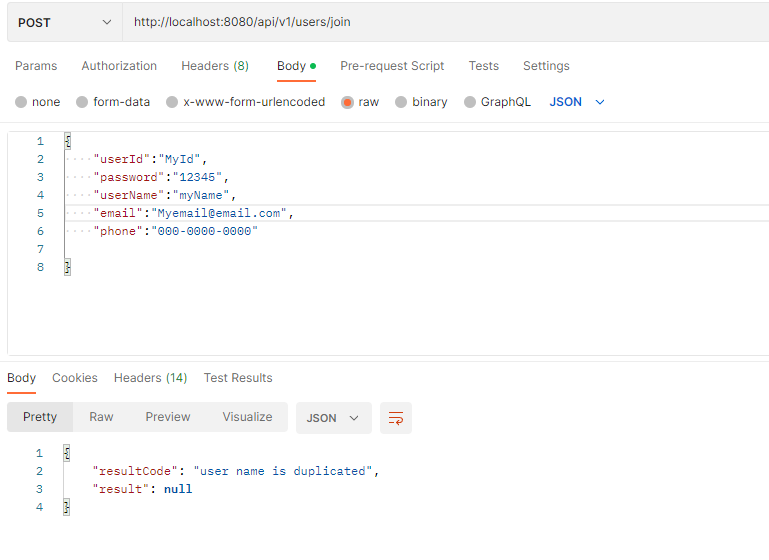
의도대로 작동함을 확인할 수 있다.