Dto Validation 예외 처리를 AOP를 적용해 개선하기
Table of contents
기존 방식
implementation 'org.springframework.boot:spring-boot-starter-validation'
위 validation 라이브러리를 사용하면
Controller에서 @RequestBody 어노테이션으로 매핑하는 request dto의 필드 유효성을 검사할 수 있다.
public class UserCreateRequest {

    @NotBlank(message = "이메일은 필수 입력 항목입니다.")
    private String email;
    @NotBlank(message = "비밀번호는 필수 입력 항목입니다.")
    private String password;
    @NotBlank(message = "닉네임은 필수 입력 항목입니다.")
    private String nickname;
    @NotBlank(message = "핸드폰 번호는 필수 입력 항목입니다.")
    private String phone;

}
위와 같이 매핑되는 필드에 validation에서 제공하는 어노테이션을 사용하면 된다.
예를 들어, 위 객체에 사용한 @NotBlank 어노테이션의 경우 null, ”“, ” “(공백으로만 이루어진 문자열) 을 허용하지 않는다.
@RestController
@RequiredArgsConstructor
@RequestMapping("/api/v1/users")
public class UserApiController {
    private final UserService userService;

    @PostMapping
    public ResponseEntity<Response<UserCreateResponse>> create(@Validated @RequestBody UserCreateRequest request, BindingResult br) {
	   if (br.hasErrors()) {
    		throw new BindingException(br.getFieldError().getDefaultMessage());
	    }
        UserCreateResponse response = userService.createUser(request);
        return ResponseEntity.status(HttpStatus.CREATED).body(Response.success(response));
    }
}
validation 어노테이션을 적용한 뒤에는, @RequestBody 어노테이션 앞에 @Validated 혹은 @Valid 어노테이션을 추가로 붙여주고
바로 뒤에 BindingResult 객체를 파라미터로 추가해주면 예외처리를 할 수 있다.
보통, POST 요청이나 PUT 요청의 경우 Http Body에 데이터를 담아서 요청을 하기 때문에, validation 처리를 유용하게 사용할 수 있을 것이다.
💡 적용하고나니, 여기서 더 개선하고 싶은 부분이 보였다.
if (br.hasErrors()) {
        throw new BindingException(br.getFieldError().getDefaultMessage());
}
validation을 통해 예외처리를 하다보면, 이 부분이 공통적으로 사용될 것이 예상되었다.
AOP적으로 처리한다면 컨트롤러 메서드 안이 핵심 비즈니스 로직만 존재할 수 있어 가독성을 높일 수 있고 불필요한 코드를 줄일 수 있을 것이라 판단이 들었다.
AOP 적으로 개선을 시켜보자
// 자바 17버전, 스프링 부트 3.0.5 기준
implementation group: 'org.springframework.boot', name: 'spring-boot-starter-aop', version: '3.0.5'
testImplementation group: 'org.springframework.boot', name: 'spring-boot-starter-aop', version: '3.0.5'
먼저 위에 있는 라이브러리를 추가해준다.
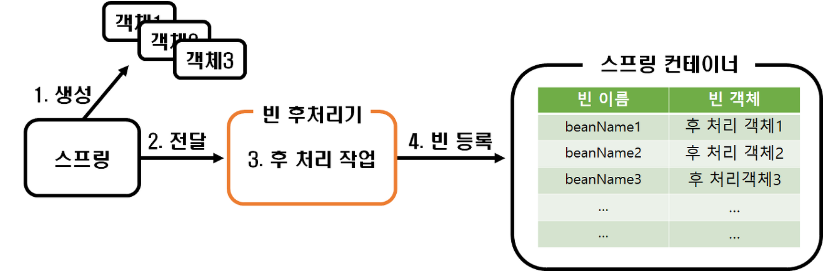
위 라이브러리를 추가하면, 스프링 부트 자동 설정으로 AnnotationAwareAspectJAutoProxyCreator 라는 빈 후처리기가 스프링 빈에 등록된다.
📌 빈 후처리기(BeanPostProcessor) : 빈 등록을 하기 전에 빈을 원하는 대로 조작할 수 있는 기능을 제공한다.
스프링 빈으로 등록된 Advisor를 자동으로 찾아서 필요한 곳에 프록시를 적용해준다.
또한, 아래 testImplementation 까지 추가를 해주어야 AOP 기능이 테스트 코드에서도 정상적으로 동작한다.
@Aspect
@Component
public class BindingCheck {

    @Around(value = "execution(* com.shoekream.controller..*.*(..))")
    public Object validAdviceHandler(ProceedingJoinPoint joinPoint) throws Throwable {
        Object[] args = joinPoint.getArgs();
        for (Object arg : args) {
            if (arg instanceof BindingResult) {
                BindingResult bindingResult = (BindingResult) arg;
                if (bindingResult.hasErrors()) {
                    String errorMessage = bindingResult.getFieldError().getDefaultMessage();
                    throw new BindingException(errorMessage);
                }
            }
        }
        return joinPoint.proceed();
    }
}
위 코드를 추가해준다.
@Aspect
포인트컷(Pointcut) 과 어드바이스(Advice) 로 구성된 어드바이저(Advisor) 의 생성을 편리하게 해주는 기능을 가진 어노테이션이다.
📌 PointCut : 부가 기능을 적용할 대상인지 아닌지를 판별해주는 필터링 로직, 주로 클래스와 메서드 이름을 가지고 판별하며 적용 대상이라면 부가 기능을 추가하고, 적용대상이 아닌 경우 실제 타깃의 메서드만을 실행
📌 Advice : 타깃 오브젝트에 적용할 부가기능을 담은 오브젝트
📌 Advisor : PointCut과 Advice를 갖고 있는, 즉 부가기능과 부가기능을 적용할 대상을 알고 있는 오브젝트
@Component
AnnotationAwareAspectJAutoProxyCreator 빈 후처리기가 어드바이저를 찾을 수 있도록 빈으로 등록해주어야 한다.
@Around
어드바이스(부가기능) 로직을 실행할 위치를 지정해준다. value 값으로는 AspectJ 표현식을 사용해 적용 위치를 지정한다.
위 코드의 경우에는
execution(* com.shoekream.controller..*.*(..))리턴타입에 상관없이 com.shoekream.controller 패키지 및 하위 패키지에 있는, 인자값이 0개 이상인 메서드 호출
ProceedingJoinPoint
어드바이스가 @Around인 경우 사용하는 객체로, 호출되는 객체에 대한 정보, 실행되는 메서드에 대한 정보 등에 접근할 수 있다.
getArgs() 메서드를 통해서 어드바이스가 적용된 메서드의 파라미터의 목록을 구했다.
@Validated를 사용하는 메서드의 파라미터에는 BindingResult 가 있으므로, 이를 추출해서 처리할 수 있게된다.
Advice 로직
if (arg instanceof BindingResult) {
    BindingResult bindingResult = (BindingResult) arg;
    if (bindingResult.hasErrors()) {
        String errorMessage = bindingResult.getFieldError().getDefaultMessage();
        throw new BindingException(errorMessage);
    }
}
ProceedingJoinPoint 로 가져온 파라미터중에 BindingResult 객체를 추출한 뒤, 에러가 존재하면 예외처리하는 로직이다.
if (br.hasErrors()) {
    throw new BindingException(br.getFieldError().getDefaultMessage());
}
원래 컨트롤러에 존재하던 예외처리 로직과 동일하다고 보면 된다.
joinPoint.proceed()
부가기능 로직이 끝났으니, 대상 객체의 원래 메서드를 실행시키는 구문이다.
BindingResult 에 에러가 존재하지 않으면, 기존의 컨트롤러 로직대로 실행될 것이다.
위 코드 원리를 바탕으로 Stream API 방식으로 변경하면 다음과 같다.
@Around(value = "execution(* com.shoekream.controller..*.*(..))")
    public Object validAdviceHandler(ProceedingJoinPoint joinPoint) throws Throwable {

        Stream.of(joinPoint.getArgs())
                .filter(arg -> arg instanceof BindingResult)
                .map(arg -> (BindingResult) arg)
                .filter(br -> br.hasErrors())
                .findAny()
                .ifPresent((br)->{
                    String errorMessage = br.getFieldError().getDefaultMessage();
                    throw new BindingException(errorMessage);
                });

        return joinPoint.proceed();
    }
개선 후
@RestController
@RequiredArgsConstructor
@RequestMapping("/api/v1/users")
public class UserApiController {
    private final UserService userService;

    @PostMapping
    public ResponseEntity<Response<UserCreateResponse>> create(@Validated @RequestBody UserCreateRequest request, BindingResult br) {
        UserCreateResponse response = userService.createUser(request);
        return ResponseEntity.status(HttpStatus.CREATED).body(Response.success(response));
    }
}
Controller 코드가 정말 깔끔해졌다.
참고로, 메서드 파라미터에 BindingResult br 는 존재해야 정상 동작한다!
테스트 코드
먼저, Controller 테스트를 WebMvcTest에 직접 설정한 Spring Security를 import 해서 사용하고 있었다.
aop 적용을 위해서는 이전에 설명했듯, 테스트용 라이브러리도 추가해주어야 하지만 추가 어노테이션을 달아야한다.
@WebMvcTest(value = UserApiController.class)
@EnableAspectJAutoProxy
@Import({SecurityConfig.class, BindingCheck.class})
class UserApiControllerTest {

   .....

}
@EnableAspectJAutoProxy 과 정의한 어드바이져 클래스인 BindingCheck.class 를 추가해주었다.
@Test
@DisplayName("회원가입 실패 테스트 (Binding Error 발생)")
void error3() throws Exception{

        UserCreateRequest request = new UserCreateRequest("email@email.com", "password1!", null, "010-0000-0000");

        mockMvc.perform(post("/api/v1/users")
                .contentType(APPLICATION_JSON)
                .content(objectMapper.writeValueAsString(request)))
                .andDo(print())
                .andExpect(jsonPath("$.message").exists())
                .andExpect(jsonPath("$.message").value("ERROR"))
                .andExpect(jsonPath("$.result").exists());
        }
위와 같이 Controller 테스트 코드를 작성해보았다. nickName 부분이 null로 입력되어있고, BindingError가 발생될 것이다.

테스트 코드도 정상 동작됨이 확인된다!
참고한 블로그
